
Showing posts with label Recipes. Show all posts
Showing posts with label Recipes. Show all posts
Thursday, May 31, 2012
FRESH Lemonade
Hey, here is a real simple fresh lemonade "recipe" if you will! It just never occurs to me to make my own instead of buying it, but lately as I have become more aware of what I am eating (and drinking in this case) I have been making this with the lemons that I got from "bountiful baskets". (No really, a 30 Pound box!) I am also going to use up the rest tonight hopefully by making lemonade concentrate, I am sure I will let you know how that goes! So here it is, I just take a quart jar, cut a lemon in half and squeeze every bit of juice out of it that I can get, and I toss the lemon in too (cause it looks cool, you know) then add 2-3 T of sugar, a few ice cubes and fill it with Water! Supremely refreshing!!! ;) It makes me happy! (It makes me really happy to add a little vodka too!)


Rhubarb (and some strawberries cause I had them) Pie
A couple of weeks ago I had Paulette's mom make a skirt for Emma for her spring concert. (It was so adorable and Emma just loved it, and I think Rozie liked making it too!) So, on one of my visits, I "stole" some rhubarb from her with the intentions of making Wade a pie, he really loves pie! However, he married the LAZIEST pie maker in the face of the earth, no really, if I was any worse I wouldn't make them! So, I googled and found this, made a few little changes and it turned out pretty darn good. So here we go, lazy pie makers recipe: I started by getting a "pat-a-crust" (recipe found here) I took a few pictures for you this time, first sift together the dry ingredients, then add the liquid and use a pastry "thing" (not sire what its called, cutter maybe, you know, horse shoe shape with wires...) or a fork to mix until you have a dough. then plop it into a greased 9inch pie plate. (note: I always save a little to use on the top of the pie, and if you try to press this all in the pie plate your crust will be really thick)
 And begin "patting" your crust into shape, making sure it isn't too thick in the "corner", where the bottom meets the side. It should look something like this when you are done:




You can then set that aside and start chopping 8c. of rhubarb for the filling, and put that in your prepared crust.

OK, this is the tricky part, the pie actually gets it "strawberry" flavor from a 6oz package of strawberry jello, so you can dump that over the rhubarb now.

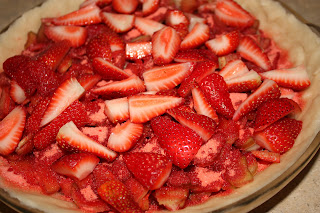
At this point, you could add the rest of the crust, and bake, I however, was channeling all my culinary abilities, and thought maybe some fresh strawberries would look nice, (and the kids wouldn't notice the rhubarb beneath) so I added those next.

Now it is ready for the rest of that crust. I just crumble it on top. Bake at 400 for 35-50 minutes, watch the crust and when it is golden brown, its done! :) there you have it, pretty easy, took longer to take the pictures that it did to make the pie!

Sunday, April 29, 2012
Home Made Corn Tortilla Chips

So there is really NO recipe for this, but I did take a few photos explaining how I did this. I got some corn tortillas in a bulk tortilla pack yesterday and we do NOT like corn tortillas, so a friend of ours suggested "chips"! And I am very glad she did! They are so good! All you need is tortillas and salt. You will also need a fryer, you could use a pan on the stove also, a place to drain some of the oil and salt the chips (that's the strainer with papertowles you see in the picture) and a tongs! Heat your oil to 400 degrees and while that is heating you can quarter your tortillas.


Once that is done and your oil is hot, just start throwing them in the fryer or pan a few at a time, let them fry between 2 and 3 minutes, make sure they are crispy, you don't want them soft in the middle! (Also, they will turn that golden color once they cool, so don't leave them in until they are golden brown, that's too long!)

Once you take them out, allow them to "drain" a bit and then salt them!

And there you have it! Your home made chips!!!
Friday, April 27, 2012
What can't you do with french bread...I mean really?!

I love to buy french bread when it is "reduced for quick sale", not that it is expensive by any means, but the cheaper the better right?! I think some people worry about freshness with french bread but, I stock up when I can, bring it home, take it out of the bag (carefully, saving the bag), wrap it in saran wrap, and pop it back in the bag and then into the freezer. I use french bread for SO many things besides the traditional "garlic toast"! I use it sliced like it is in the pic. for toasted cheese sandwiches, just plain sandwiches, toast with breakfast, you can slice it thicker for french toast, cut it the long way to make a "sub" for the entire family, (this is really handy while camping or on a road trip), slice real thick slices to double as buns (once thick sliced then slice top/bottom), you can use it in french toast bake recipes, it really is "all purpose". So, next time you see french bread on sale, think past the traditional garlic toast!!!
Thursday, April 26, 2012
I can NOT believe that I have yet to post about breakfast burritos!!!!!
This isn't really a recipe since we all get the basic "gist" of breakfast burritos! I use any kind of potatoes that I have around (for real, I have used left over fried potatoes, I have made french fries, hash browns, and even left over grilled roasted potatoes), I fry 1-2 pounds of sausage (again, anything from Jimmy Dean to deer sausage) and 1dozen eggs (scrambled usually in the same pan with the sausage once it is brown). This will make 10-14 LARGE tortilla burritos, or more smaller ones. I just put them together one at a time (this is when you could add cheese and salsa also) and wrap them in tin foil. I then put them all in a freezer bag and throw them in the freezer. When you want to heat one up just put it in the microwave for between 2 and 4 minutes depending on size, and microwave. We love these, they are so handy to have made up!
Wednesday, April 11, 2012
On peeling things...
dont do it...the end.
No matter what anyone tells you, you do NOT have to peel veggies! Even Potatoes! I NEVER, EVER, under ANY circumstance peel a veggie...come to my house you will see.
No matter what anyone tells you, you do NOT have to peel veggies! Even Potatoes! I NEVER, EVER, under ANY circumstance peel a veggie...come to my house you will see.
"REAL" Fries

No recipe here, just a friendly reminder that "real" fries are much better than frozen! ;) And SUPER easy!
Rhubarb Strawberry Jam

8 cups of chopped rhubarb
4 cups of white sugar
2 (3oz) packages of Strawberry Jello
Mix the sugar with the rhubarb and cover with a towel. You can let this sit on your counter for a couple of hours. You wil notice that if will get a little "juicy" and that means it is ready to put in your pot. Bring this mixture to a boil (I know you think I am crazy but the water in the rhubarb will come out, there is something there to boil trust me) while this is kept at a rolling boil, mash the rhubarb (I use a potato masher) as it becomes soft. IF you do not do this you will just have a very chunky jam. After you have boiled this and the rhubarb is mashed and soft, remove from heat and add the jello. Stir until well combined and transfer immediately into freezer safe comtainers or canning jars. If using canning jars follow the proper canning procedures and your jars should seal on their own. If they don't, you can freeze it, or put it in the fridge and use it. That's about as easy as jam making gets folks!!!! Also note, this is a really sweet jam, you can of course cut make the sugar to your liking! You can also add 2-4 cups of fresh strawberries. The photo is of one batch, and those are all half pint jars/containers.
Quick and Easy French Toast Bake

You will need:
2 rolls (cans) of refrigerated cinnamon rolls
6 eggs
Cream (to scramble your eggs)
Vanilla (to add to the scrambled eggs)
1/2 c. Maple Syrup
You just prepare a 9 x 13 baking dish and preheat the oven to 350. Quarter the rolls and toss them in the baking dish. Scramble the eggs with cream, vanilla, and syrup. Pour that over the rolls and bake until the eggs are set and the rolls are golden brown and cooked through. About 30-45 minutes depending on your oven. Top with some more syrup and the icing that came with the rolls. Pretty stinkin easy if you ask me!
Tuesday, April 3, 2012
Freezer Breakfast

I made these up this weekend to have in the freezer, they are just scrambled egg, cheese, and bacon. I wrapped them in tin foil and put them in a freezer bag. We take them out one at a time, unwrap them and microwave for 1 minute 30 seconds. Have them on toast or an English muffin! Wade is liking them, he was a little sick of burritos! :)
Beer Bread

This is my recipe for home made beer bread. We really like this recipe, I make this to eat with soups and chili. It is cheap, and beyond simple! You will need:
3 c. self rising flour (i use all purpose flower, and look up the substitution online)
2 T. Honey
1 can of beer. Any kind of beer works fine.
Combine all until all flour is moist, this is thick and will be somewhat lumpy. Transfer to a greased loaf pan and bake at 350 degrees for about 45 min-1hour. I dot the top of mine with 2 pats of butter before baking, and I run a stick of butter across the top and sides when I take it out, if you do not do this, the crust does get pretty hard, my husband likes it like that, but the kids do not! This is great sliced up and served with a meal, also great cubed up and swerved with a dip. Slicing is much easier with an electric knife, because of the harder crust.
Easy Mini Cheesecakes

These are just a pudding mix snack but they are pretty yummy! I just put paper cups in muffin tins first. Then I crushed up a few graham crackers and sprinkled the crumbs in the cups until the bottom was covered. I made 2 boxes of cheesecake flavored pudding, and let it set up a bit so I could spoon it into the cups. I thin let those sit until they were set and topped them with some rhubarb strawberry jam. You could also use any pie filling for topping! Super easy and I let them set up while we were eating supper and topped them right before serving! I made a dozen with the 2 boxes of mix.
Wednesday, March 28, 2012
The easiest Banana Muffins EVER

Monday, March 26, 2012
"CUP"cakes

Quick and easy "cup" cakes!
You will need:
Cake mix
water
cup
Measure out 1/4 cup of cake mix and add 1T of water in a microwave safe mug. Micro for 30-45 seconds. That's it! if you wish to make a larger portion in a bowl, simply double and micro for a minute and a half! :) I had a bottle of pre-made glaze, but you could use anything really. Some ideas would be chocolate chips, powder sugar glaze (powder sugar and milk), or any ice cream topping...or actual ice cream...you get my point! We tried this tonight and it will be a favorite here! Wade is a dessert eater, and I can have this ready in 3 minutes, honestly! And the kids got it for a bed time snack! How easy is that?
Crock Pot Sausage and Potato Soup

1lb. of ground meat, browned and drained. (I don't care what it is, beef, turkey, deer, anything!) (I used sausage, hence the name)
about 4-6 medium potatoes cubed
shredded carrots( I bet I used a cup, I had them frozen from the garden in 2 cup packages and used half)
4 c. of chicken stock
1 chopped onion (I keep onion chopped in the freezer)
4T. of butter
1/4c flour
and whatever seasonings you please, we are plain eaters so I used celery salt (you could use celery), and salt and pepper, and some parsley
I turned my slow cooker to "warm" and left it all day. I think 6 hours on low would be good. When you get home or 30 minutes before serving add:
8 oz. of shredded cheese (I used velveeta, cause that makes everything better)
11/2c. of milk or cream.
and simmer until the cheese is melted! It sounds like a lot but with all the stuff from the garden, I didn't buy a thing for this...and it was REALLY good!
PS: Photo was before I left for work...pre cheese and milk!
Sunday, March 25, 2012
Home Made Flour Tortillas


Banana Cake

Here is a great "quick" dessert. It is so simple! You will need:
1 box cake mix (white or yellow will do, I used french vanilla)
1/2c. brown sugar
1t. cinnamon
1c. mashed banana
and the egg/oil suggested on the cake box
mix all ingredients and bake as directed! This cake is so yummy(and so gone)! I frosted it with basic cream cheese frosting and it only lasted 2 days here! Hope you get a chance to try this, it's a nice "addition" to your basic cake mix.
Thursday, February 2, 2012
My love of "Dutch Honey"
This is something I absolutely LOVE and almost HATE to eat pancakes, waffles, or french toast without it! I have heard it called a number of things, and it seems like the recipes vary from family to family but the one I use is this:
1 c. cream
1 c. white/light "karo" syrup
1 c. packed brown sugar
(I have also seen it with white sugar and dark syrup, but I have never tried it! I would say if that's what you have on hand, go for it!)
You mix these in a glass bowl and microwave on high for 5-10 minutes. Serve warm and store the extra in a jar in the fridge. When you want to use the "left overs" just microwave it again for 30 seconds- 1 minute and shake it up or stir it! This will also get you by in a pinch if you are out of maple syrup!
1 c. cream
1 c. white/light "karo" syrup
1 c. packed brown sugar
(I have also seen it with white sugar and dark syrup, but I have never tried it! I would say if that's what you have on hand, go for it!)
You mix these in a glass bowl and microwave on high for 5-10 minutes. Serve warm and store the extra in a jar in the fridge. When you want to use the "left overs" just microwave it again for 30 seconds- 1 minute and shake it up or stir it! This will also get you by in a pinch if you are out of maple syrup!
Friday, October 21, 2011
Home Made Chicken Broth-and then soup

Subscribe to:
Posts (Atom)